1. Introduction
Checkmk includes a extensive module for monitoring Microsoft Azure, consisting of a connector to Azure and a comprehensive collection of check plug-ins that retrieve and evaluate various metrics and statuses for you.
In addition to general information about the costs that are incurred by your Azure environment and the current status of the Azure services in your region, you can monitor the following Azure products with all editions of Checkmk:
With ![]() Checkmk Cloud and
Checkmk Cloud and ![]() Checkmk MSP you can also include the following products in your monitoring system:
Checkmk MSP you can also include the following products in your monitoring system:
A complete listing of all available check plug-ins for monitoring Microsoft Azure can be found in our Catalog of check plug-ins and we describe how to include your AKS (Azure Kubernetes Service) clusters in Checkmk in the article Monitoring Kubernetes.
2. Setting up monitoring via Quick Setup (optional)
The quickest way to set up an easy-to-read monitoring for Azure environments is with our Quick Setup. To do this, open Setup > Quick Setup > Microsoft Azure and click on Add configuration. The Quick Setup will then guide you step by step to your goal.
The biggest advantage of Quick Setup is that any errors will be displayed immediately during the configuration process. If the worst comes to the worst, you will then receive a clear and dedicated indication of what you need to correct before you can move on to the next step.
Detailed instructions on how to make the necessary preparations in your Azure environment can be found in the chapter Preparing Azure for Checkmk.
If you want or need to make changes to the configuration created by the Quick Setup at a later time, you can go back to Setup > Quick Setup.
There, click on the ![]() icon and then select the component you want to edit.
icon and then select the component you want to edit.
The other chapters of this article are only intended as a reference for users of Quick Setup. However, if your Azure environment is rather complex, it is recommended that you continue to carry out the setup according to the following steps. |
3. Preparing Azure for Checkmk
To monitor Azure with Checkmk, you will need some data from your Azure environment. As a minimum, the directory ID (also known as the tenant ID) and an application ID (also known as the client ID) will be required. In most cases, you will also need to enter your subscription ID. An exception to this is when you only want to monitor your Azure AD, in which case you won’t need to enter your subscription ID.
In the following chapters, we will show you where you can find this data and what requirements you need to fulfill.
At this point, it should be noted that the web portals of hyperscalers and cloud service providers are subject to ongoing change. We endeavor to keep the following information up to date and at the same time general enough to ensure that the respective locations and functions in the portal can still be found even if a screenshot no longer corresponds 100 % to what you currently see. |
3.1. Creating an app
First register an app in Azure.
This app will be used by Checkmk to read the desired data from Azure.
You will find the option for this in the Azure portal under (All services > Identity > Identity management > ) App registrations.
Alternatively, here you can use the portal search and enter App registrations.
Once on the page, you must now click on New registration.
Assign an identifying name of your choice.
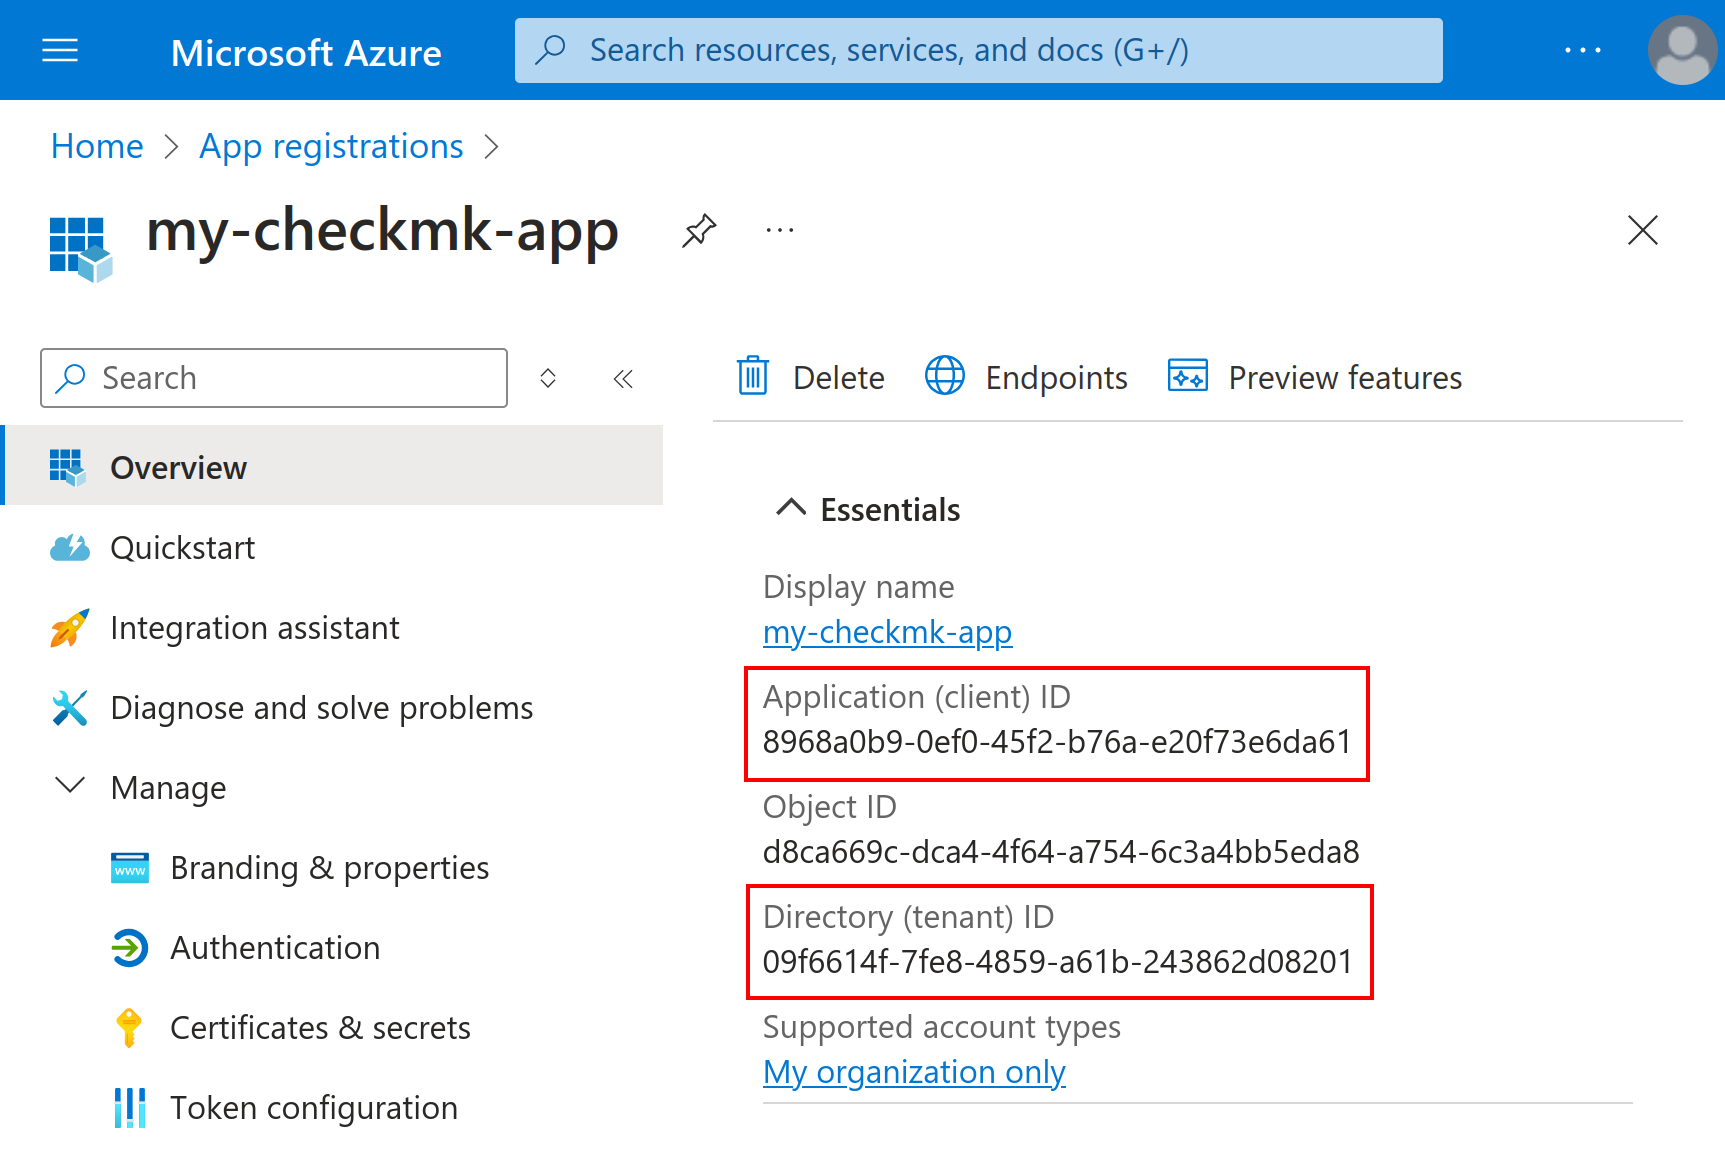
In the example, we use my-checkmk-app.
This name is only for information purposes, however.
Instead, the reference to the app is made via the application ID, which you will see in the next step.
You do not need to change anything in the Supported account types section and the Redirect URI field must remain empty.
Confirm your entries by clicking on Register.

Once you have created the app, you should see an overview of this new app. If this is not the case, you will find the new app in the list of all App registrations described above in the All applications tab. In the details for the app, you will now find both the Application (client) ID and the Directory (tenant) ID, which you must enter later in Checkmk.
3.2. Creating a client secret for the app
Next you will also need a client secret with which Checkmk can log in to the Azure API. To generate such a secret, click on Certificates & secrets in the app overview, then on the Client secrets tab and finally on New client secret.

This opens the Add a client secret dialog. Assign any name and select for how long the secret should be valid. If you later activate the App Registrations option in the rule for the special agent, you will receive a practical service that reminds you when this validity period is coming to an end. Confirm the dialog by clicking on Add.

It is important now that you copy the Value content in this new secret immediately, since after a certain time, only the first three characters of such secrets will be displayed in the Azure portal.

3.3. Optional: adding further API permissions
You must grant the app additional API permissions if you want to monitor the following services with Checkmk:
Users in the Active Directory
AD Connect Sync
App Registrations
You start assigning the permissions in the overview of your new app, which you should still have open from the previous section.
Click on API permissions and then on Add a permission.
In the dialog that opens, you must find and click on Microsoft Graph.
Then select Application permissions and enter Directory.Read.All in the search field.
Activate the corresponding checkbox and click on Add permissions.
Additional consent from an administrator of your Azure environment is required for this permission (Admin consent required).
If you do not see the Grant admin consent button above the list of granted permissions, you must contact the responsible administrator.
3.4. Assigning a role to the app
To enable Checkmk to access the monitoring data via the new app, you must assign a role to the app at the subscription level. To do this, select All services in the main navigation on the left-hand side and then under General the Subscriptions entry. Again, you can use the search function in the portal if you cannot find the relevant button.
If you have multiple subscriptions, you will now need to click on the name of the subscription you wish to monitor. You will then be taken to an overview page for your subscription. Make a note of the Subscription ID here. You will need to enter this later in the special agent rule.
Then click on Access Control (IAM) and then on Add and then on Add role assignment:

Now select the role named Reader and with the Type BuiltInRole. As there are in total over 100 roles with the word 'Reader' in their name, it is important to be careful here. Then click on Next to go to the Members tab.
Click here on + Select members.

In the Select members dialog, enter the name of the app as you created it earlier into the search field, select this app and click Select. After two more clicks on Review + assign, the setup in the Azure portal will have been completed.
4. Setting up basic monitoring in Checkmk
Before you start with the configuration in Checkmk, make sure that you have the following four Azure-specific information ready, which you obtained in the previous chapter:
Your tenant ID (also known as "Directory ID")
The application ID (client ID) of the app
The client secret for this app
Your subscription ID
4.1. Creating a host for Azure
Even though you are not dealing with a physical host in Azure, create a host for your Azure directory in Checkmk. The host name you can define at will. Important: Because Azure is a service and therefore does not have an IP address or DNS name (the special agent does the access itself), you must set the IP address family to No IP.

It is best to save with Save & view folder at this point, because of course the service discovery cannot work yet.
4.2. Configuring the Azure agent
Since Azure cannot be queried through the regular Checkmk agent, you now set up the Azure special agent. In this situation Checkmk does not contact the target host over TCP port 6556 as usual, instead it calls a utility that communicates with the target system via Azure’s application-specific API.
To do this, under Setup > Agents > VM, cloud, container > Microsoft Azure create a rule whose conditions apply exclusively to the Azure host that has just been created. There you will find the input fields for the IDs and the secret:

Here you can also select the resource groups or resources that you want to monitor. If you have not checked explicitly specified groups, all resource groups are automatically monitored.
4.3. Testing
If you now perform a service discovery on the Azure host, at least the service called Azure Agent Info should be detected:

If access to the API does not work (because of a wrong ID, bad permissions or because of a wrong client secret as in the example below), a corresponding error message will appear in the status text of Azure Agent Info:

4.4. Making resource groups available as hosts
For clarity, Azure monitoring in Checkmk has been designed so that each Azure resource group is represented by a logical (so to speak) host in Checkmk. This is done with the help of the piggyback mechanism. This piggyback will take data from the Azure host using special agents, and within Checkmk redirect it to these resource group hosts.
The resource group hosts do not automatically appear in Checkmk. Place these hosts either manually or optionally with the dynamic host management. Important — when doing so the names of the hosts must exactly match the names of the resource groups — and this is also case-sensitive! If you are uncertain about the exact spelling of the groups' names, you can do this directly from the Azure Agent Info service on the Azure host.
By the way — with the find_piggy_orphans auxiliary script from the treasures directory you will find all of the piggybacked hosts for which there are data,
but which have not yet been created as a host in Checkmk:
OMD[mysite]:~$ share/doc/check_mk/treasures/find_piggy_orphans
Glastonbury
Woodstock
Configure the resource group hosts without an IP address (analogous to the Azure host), and select No API integrations, no Checkmk agent as the agent and Always use and expect piggyback data as piggyback.

If you now perform a service discovery on one of these resource group hosts, you will find there are additional services that specifically relate to this resource group:

If you want to freely-choose the names of the resource group hosts, with the Setup > Agents > Access to Agents > Host name translation for piggybacked hosts rule you can define a conversion of resource groups to hosts. |
5. Advanced configuration
5.1. Virtual machines (VMs)
When you use Azure to monitor virtual machines which simultaneously serve as your normal hosts in Checkmk — you can assign the Azure services associated with those VMs directly to the VM hosts in Checkmk instead of to the resource group hosts.
To do this, in the Azure rule, under the Map data relating to VMs option, select the Map data to the VM itself setting. For this to work the VM’s Checkmk host in monitoring must have exactly the same name as the corresponding VM in Azure.
5.2. Monitoring costs
The Microsoft Azure rule is preset so that Checkmk also monitors all costs incurred in your Azure environment. Specifically, the services display the costs incurred on the previous day. In this way you can quickly determine if there have been any changes.
Several services are created to get a better overview of exactly where costs have been incurred and to be able to set specific thresholds.
The total costs at the level of your Azure directory are displayed for the Azure host that you created first.
In addition, services are created for each host that represents a resource group.
At both levels, Checkmk generates one service for the costs per so-called 'resource provider' (e.g. microsoft.compute and microsoft.network).
The Costs Summary service then shows the total sum for the resource group or for the entire Azure directory.
You can use the Azure Usage Details (Costs) rule to define individual thresholds for all of these services.
If you do not wish to monitor costs, you must deactivate the Usage Details option in the Microsoft Azure rule.
5.3. Importing tags from Azure
By default, Checkmk imports all tags from your Azure environment and converts them into host and service labels. The assignment runs as expected. Tags that are attached to a resource group are assigned in Checkmk to the host that represents this resource group and the tags of a VM become host labels for this VM.
All labels created in this way are given the prefix cmk/azure/.
In addition, characters and values that would lead to invalid labels in Checkmk are replaced.
Empty values (i.e. the Value field in Azure) are replaced with true and colons within the name or value are replaced with an underscore.
For reasons of compatibility, the tags from Azure are also imported without the prefix |
The Filter tags imported as host/service labels option allows you to control the import of tags from Azure. If you activate the checkbox here, you can completely prevent the import with Do not import tags. If you select Filter valid tags by key pattern here, you can enter a regular expression in the following field. Checkmk will then only generate labels from tags that match this regular expression.
5.4. Limit for API queries
Currently the API queries that Checkmk needs for monitoring Azure (as opposed to AWS) are free — however there is a limit to the number of queries permitted per time period (the "throttling limit"). As of today, the API queries that Checkmk requires for monitoring are free of charge with Azure (in contrast to AWS). However, there is a limit on the number of queries per time ('throttling limits').
Due to the structure of the API, Checkmk requires at least one or more queries per requested resource. Therefore the total number of queries scales linearly with the number of resources being monitored. If the query limit is reached or exceeded, the query fails with a HTTP code 429 (too many requests), and the Check_MK service for the Azure host is flagged as CRIT.
This limit results from Azure’s so-called 'token bucket' algorithm. It all starts with you having a 'credit' of 250 remaining queries — each query consumes one of these. Simultaneously 25 queries per second are added to the credit. The output of the Azure Agent Info service lets you see how many queries are currently left.
Specifically, this means that:
If your query rate is sufficiently low, the available queries are always just under 250.
If your rate is too high, the credit will slowly go down to 0 and then errors will occur sporadically in the query.
In this case you can reduce the polling rate by querying fewer polling resource groups or resources, or by reducing the check interval for the Check_MK active check on the Azure host. This is possible with the Normal check interval for service checks rule.
So that you can react in time, the Azure Agent Info service monitors the number of remaining queries. By default, no threshold are set. You can set these yourself in the rule Azure Agent Info.
The article Understand how Azure Resource Manager throttles requests on Microsoft Learn explains this in more detail.
6. Dashboards
![]() For a convenient start into Azure monitoring, Checkmk ships from Checkmk Cloud onwards
the two built-in dashboards, Azure VM instances and Azure storage accounts.
Both of these can be found as menu items in the monitoring under Monitor > Cloud.
For a convenient start into Azure monitoring, Checkmk ships from Checkmk Cloud onwards
the two built-in dashboards, Azure VM instances and Azure storage accounts.
Both of these can be found as menu items in the monitoring under Monitor > Cloud.
To provide a clearer impression, following are two examples of how these dashboards are structured. First, the VM instances dashboard, in which you can compare the current state on the left side and the chronological history of the most important metrics on the right side:

The dashboard for the storage accounts is structured very similarly. On the left-hand side, you will find current data for the respective buckets. On the right, the most important metrics are again displayed chronologically:
